Wednesday, October 27, 2010

Programs and pipeline - What Ive learnt

Programs:
Maya
  • Blendshapes
  • Mental ray
  • shading networks
  • rapid animation
  • live footage in maya
  • render layers for live footage
  • producing HDR images and light spheres
  • creating custom rig for arm
Matchmover
  • setting up shots for MM
  • camera tracking
  • object tracking
  • MM pipeline
  • recording camera attributes (Live footage camera)
Zbrush
  • zbrush maya pipeline
  • producing hi poly mesh with normal mapping
  • zbrush workflow
AFX
  • Particle system

COMPLETED SEQUENCE

This is the final rendered out sequence with audio. The addition of the cell sequence has given the piece a slightly sinister edge which I think compliments the style.

Im happy with most of the piece with the exception of 2 aspects. Firstly the animation of the actual arm is ok, as I only had time for 2 drafts of each shot, that is draft 1, the initial block out of the motion and draft 2 being a clean up of the block out. Secondly, the simulation of a hand cranked camera i think could have better been accomplished if I was able to pull every 3 frame from the entire production which would have given me, I suspect, a more staggered motion as authentic footage from the era isnt just slightly accelerated but has a randomness to it also.

Overall Im quite happy with the outcome, especially as there was much to learn in the project not only realising a quite difficult concept into existence, but making sure the pipeline between all the different areas came together without sacrificing the outcome of the final product.
Draft - cell mutation sequence

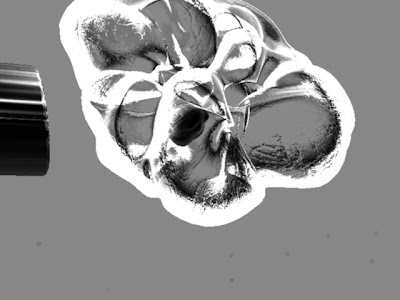
This is the PB of the sequence that will precede the shadow wall shot. The movements are relatively successful with most attention going towards the cell moving in an organic non uniform manner. The keys were placed in a way that shows the cell initially being shocked and a reaction, then a delayed mutated response to the attack.

Cell animation screen shots

Heres are some production shots of the cell mutating with an emphasis on the look being through a microscope. The thing to the left in shot 2 is a tiny piece of wire that comes in to zap the cell to initiate a mutated response.


Tuesday, October 26, 2010

Draft 2

Draft 2 is more in the direction I was heading, with more input into the story, and the change of musik as significantly altered the mood of the piece, which is quite surprising. Its still missing the cell sequence and the change to shot 5 and shot 1 which will be done today.

Blend shapes for cell mutation sequence

These are the 5 different blendshapes done in zbrush for the cell mutation sequence.

These different shapes will be used along with a basic 3 joint rig to give the impression of a cell floating and mutating inside a liquid, which will be further expressed using a basic particle system.

more to follow.

Sunday, October 24, 2010

Draft 1 - with audio

This is draft 1 with rough cut of audio, and with the time stretch (80%) adjust layer added to further simulate a hand cranked effect, which after applying it realised my animation is 20% shorter!

Originally Ive intended to ad a micro scope shot of a set of cells mutating (using blendshapes) but im not sure if time will permit.

I think this is 70% the quality I was looking for so im not entirely unhappy with the results.

This project has furthered my interest in the field of cg and live footage.

Draft 1

After much attention to how the rig animates, Ive finally produced drat1 of the AFX file, and altho the animation of the arm isnt by any means perfect, Ill have to abandon the project in the next 24 hrs due to work commitments.

Ive taken 2 songs for the project which I edited together and I think builds nicely as the visual elements are and the strange side, so is the music.

The first song is a remake of Nico's 'Janitor of lunacy by the group Soap & Skin, which is then followed by Plaids 'Zeal'.

The Footage in shot 2 and the final credits page is of Manchester shot in 1901, which shows a great example of an everyday life street scene where not too many realise the presents of a camera and operator.

Friday, October 22, 2010

Problems still

Even though I spent 2 days weight painting the arm to reduce extreme deformation, Its apparent some still exists. I did thin about using a basic 3 muscle group system to promote muscle flection, it could have added more issues with deformation than what I was trying to prevent.

Thursday, October 21, 2010

Treated still - shot 6

The final footage page wont look as good as this still done in photoshop, but the process to colour grade the footage would require a lot more time.

Tuesday, October 19, 2010

Scene 7

This scene is the strangest of them all, as the live footage is lit with a single 30 cycle (per second) strobe light which I bolted into a rig along with a camera to the ceiling of the bathroom at my house, as this was the only way to get a vertical drop down view of the bath tub. The lighting in maya is just one arealight with post infi oscillate cycle placed on intensity. This scene is purely experimental and I wont be that surprised if it fails to achieve my goal. It will next time though.

Scene 6

This shot is just an interstitial placement, experimenting further with cg to live footage pipeline.

Scene 5

This shot was and an interesting shot to do, although the obvious problem with syncing the footage with CG is that fact the body doesnt react to the sharp movement of the arm snapping to grab the moth, which slipped through the story boarding process. It was quite time consuming to get the shadow of the arm to diffuse out as the shadows moves up to the shoulder of the arm (furthest away from the actual wall) One aspect Ive leant about combining CG and Live footage is, although you can get away with making mistakes in 3d to begin with and edit in post prod, its a time consuming process and is essentially fixing mistakes laziness produced in the first place. Ive tried to make as little work for myself in PP.

Scene 4

This scene, will probably be the first shot - as its and interesting experiment with just using 3d shadows integrating with 2d shadows - although Im unsure whether this will be possible with just a regular multiply layer, and I suspect Ill need to manually mask the shadow into the live shadow.

Scene 3

With each shot, ive tried to experiment with something different, and in this scene Ive composited some early 20th century footage in the background with live footage, and finally the cg - which is almost there.

Monday, October 18, 2010

Scene 2

Draft 1 of scene 2 - animation wont get more refined than this due to time frame - which I will redo over the holidays. This shot has a second component to it - as the image that is shown, is the reflected image, the actual character is behind the camera, which will be evident once the hand moves towards the mirror to draw the symbol on the glass with a lipstick.The experiments with not only cg and live footage but doubling up the cg to act as one element.

Saturday, October 16, 2010

Scene 1

this is the first draft of shot 1, and although the animation isnt quite there, its close based on time allowed for each shot to be produced (8 hrs). Not sure if I like the final part (application of lipstip), and might cut this from the shot. The rig is behaving, in most part, to what was expected, although the double IK chain is hard to work, and if there was more time, I would have gone FK.

Tuesday, October 12, 2010

Heart rig test

Quick test to show the heart functioning inside the arm cavity, although the fibrillation is out somewhat due to the left ventricle pumping quick enough. This will run through out the shots as its set to a post cyclic effect (GE).

Rigging has begun

A simple rig will be used for the animation, which will consist of the arm itself and a proxy torso that will be there for gauging rotation of upper body, but also for receiving shadows which will be comp'd on to the footage.

Monday, October 11, 2010

Render test

First render test with textures and raytraced shadows applied inside light globe. Im fairly happy with the overall look of the arm at moment with the poly count just exceeding 100k (limit was 100k) and the normal maps are performing well as expect. The rigging and weight mapping will be the final part of preproduction and perhaps the most tedious, as the arm doesnt follow standard anatomical structure, I have to make up the general flexion and extension the limb will do. This will be achieved probably using a 2 IK chains (not using fk as time is limited) joined together with a dummy body and face to receive shadows that would fall onto the body and face in the actual footage.


Sunday, October 10, 2010

Arm concept - final detail

The geometry for the concept has been detailed and is now ready for UV mapping for normal maps / texture maps etc. The poly count for this geom is 18m, but the mesh will on be about 90k polys as the maps will do most of the detail work.

Saturday, October 9, 2010

Matchmoving

Just finished ready Matchmover: Invisible art of camera tracking, which is a great book that looks at the pipeline and process between Maya, Matchmover (boujou in small amounts) and focuses on tracking camera of objects in footage. As I have made detailed notes for each shot, which includes focus / lens / height and depth of camera, tilt of tripod these can be transferred into matchmover to produce a move solution for the body (which arm will be attached) and camera (maya) which will be setup for animation.

AFX old film effect test

This is a quick test ran on the footage that was shot today. It consists of about 10 different filters in the footage and a time remapping of 17% (faster) which is at a good level to start refining to the look Im after, although to really obtain that vintage look, is probably to shoot with actual old fim and camera as the CCD and lens in this Sony cam create quite sharp images.

Concept arm - more detail (50%)

Progress shots of the detail being filled into the model, which concist of 3 different areas of materials. Firstly, we have the branch like structure growing out of the arm which will eventually have leaves sprouting, then were have the skin surface which will change as you go from top of the humorous down to the wrist. Finally we have the heart which will probably not get much more detailed, as the use of a texture map will give it the added detail it will need.

Light probe equip

Finally located a place locally that has great 304 stainless steal balls (200mm) for producing hdr light globes for the lighting solution. 200mm for $29 from jalex hardware.

Once the balls was setup and the shot was ready to be taken i set up the camera in 2 location 90˙ perpendicular to the previous shot. This would in theory, take information of the room to then unwrap and rotate the images into one.


The free app I used was HDRSHOP, which is ok for the free, but it has some manual functions which take a while to master I think. I was going to produce HDR images of the room but my camera is a pretty good video cam, but average still camera, so Ive worked with what i have to the best of its abilities. As you can see below, this image isnt rotated correctly, and I had more time I could produce a more accurate LP image, but as this is just for basic lighting aid and some reflection in the scene, its not necessary to refine.

Thursday, October 7, 2010

Maya - zbrush pipeline

The arm model has been based meshed in maya and imported into zbrush for sculpting. Taking a 2d concept sketch to the 3d require much work, and there are always parts of the concept that dont turn out the way they should have, but also, there are happy accidents that occur which evens the process out, although modeling straight in zbrush with no concepts would produce unpredictable results, and with what ive drawn out will at a minimum, end up looking as good as the concept shape.

The poly count for the final model will hopefully be around 200k with the use of UV'd normal maps to simulate extreme detail. The red wax material image is perhaps level 1 of 4 levels of details Ill be building, as starting with basic volumes and moving up to finer details is a logical workflow for creating the model.


Monday, October 4, 2010

View from window

This footage will be composited into the window frame (post) behind the girl as she applies her makeup, which will help focus the period of the footage to early 20th Century. Its Early Thomas Edison footage which is some of the best Ive seen as it captures everyday life in a developing industrialized city, similar to A. Kahn imagery.

Concept arm breakdown

This is the arm broken down in to its 3 structural properties such as the bones of the arm itself, the fleshy mass of the limb and finally the branch like material that will grown out of the flesh and envelope it in parts. This image is for modeling purposes and rigging more than anything, as it allows me to quickly model each component of the arm separately and clearly. The textures will be worked out last (pre rigging).

Saturday, October 2, 2010

Final silh. arm concept

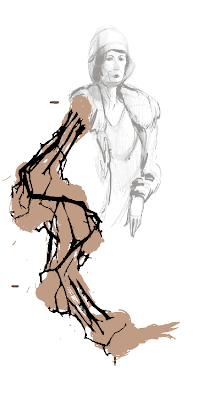
This is the finalised shape for the CG arm, which will be an interesting composition of organic mutated flesh and black twisting branch like skeleton. Ive focused on a rather dramatic shape and size for the right arm as it has to look unusually large on the figure to essentially dominate the scene and and shift focus from the person to the limb itself as if it's in control of the body supporting and not vice-versa.

The idea of the arm as the dominant feature of the body, allows me to play with rigging effects such as quirky functions other than standard musculature, for instance, part of the arm could look as if its breathing independent of the hosts lungs or just some interesting muscle pulsating under skin.